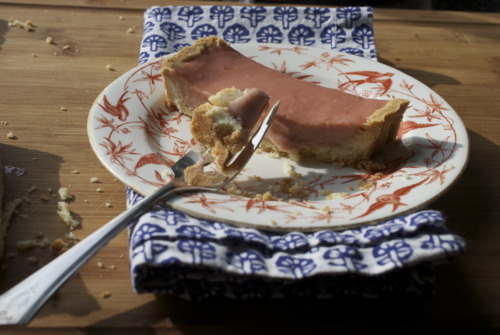
Key Lime Cordial

I relented and bought a new umbrella today. I thought that I wouldn’t need to replace my last lost one because it was May. Because the sun should be shining, and life should be swell but instead it rained all day. And all yesterday, and the day before that. There are these brief moments where the sun almost shines through the clouds and it’s almost like there isn’t a blanket of white and grey over us. And then the moment passes and the sun is completely invisble again. And I go back to day dreams of summer days and picnics on Wreck Beach and drinks on patios watching the sunset.

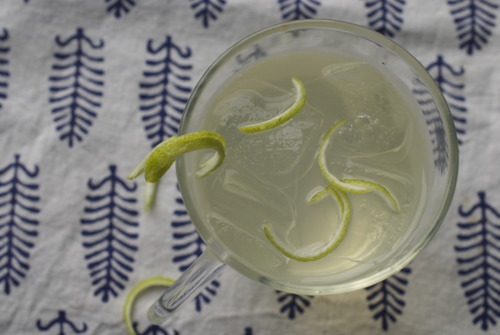
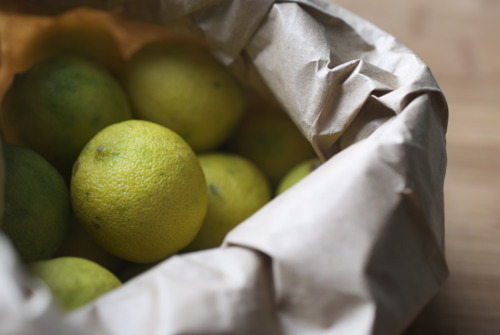
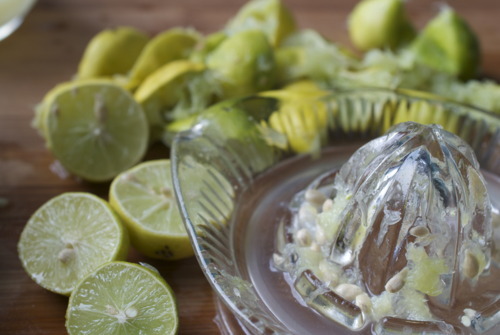
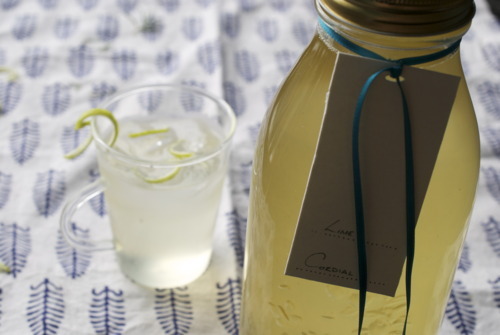
This is a recipe in preparation for those times, and it also makes use of one of the last reminants of the citrus season, the key lime. This makes an afternoon G & T into something glorious, this with a splash of vodka and some sparkling water is the perfect post work wind down drink. This means you never have to run out to the store to get lemons and limes before a party, because this is better. This is not the lime cordial you buy at the store with fruit juices from concentrate. This is so fresh you can hardly tell it wasn’t squeezed just for your drink. This you want in your house at all times.

Key Lime Cordial

Adapted from the Lime Cordial recipe by Stephanie Alexander. 

*You can make this with regular limes if you can’t find them of course, but there is a soft sweetness to a key lime that elevates this. I’ll admit that they take work, i had to squeeze 30 key limes but I also got over 2 litres of cordial, so that’s okay by me.

**I bought both citric and tartaric acids at a gourmet shop near me, but you can also buy them both at make your own wine stores.


300ml Key Lime Juice (about 30 key limes)*

2kL Sugar

1L Water

30g Citric Acid**

30g Tartaric Acid**

Bring a large pot of water to a boil

Wash 2x 1L jars or bottles carefully then place them and their lids in the pot of water and sterelize them.

In the meantime bring the water and sugar up to a boil.

When the sugar has totally dissolved add in the acids, and bring back to a boil.

Now add the juice and bring it back to a raging boil.

As soon as it hits that mark, turn off the heat. Take the jars out of the water and set them straight on a clean counter. Pour in the cordial leaving a 1/4 inch of head space and put on the steralized lids. It can be tricky to judge how much to pour in because of the bubbles, if your unsure add a little extra.

Allow to cool slowly at room temperature making sure the lids seal properly.

This will keep for ages, and if you don’t feel like sealing the jars it will last a long time in the fridge with a screw cap.  

Rhubarb Lavender Tart

I’ve been watching rhubarb recipes go up on blogs that I follow for several weeks now. Some of them I pinned to make later, some of them I wrote down flavour combinations for, but most of them I jsut glowered at. I’ve been glaring and frowning and giving the stink eye to every blog written by everyone outside of Vancouver because it seems that everyone else has had a month of Spring already, and we are just starting (knock on wood) to get out of the clouds. It was a slow, cold April.

So last weekend when I noticed a neighbours rhubarb patch looking healthy I started to get excited and I full blown squealed (to the great alarm of an elderly man passing by me) when I found some at my local green grocer a couple days ago. I love rhubarb I really do.

This tart is not as complicated as most tarts, it’s downright easy if you have a food processor, but still totally possible to do without. You don’t need to blind bake the shortbread the way you do with most tarts, and curd comes together in just a few minutes. The lavender is optional if you can’t find it at your local shop although it really does make this extra special. The only hard part is letting it cool before you cut into it.

Rhubarb Lavender Tart

Lavender Shortbread Crust

1/2 cup Butter, room temperature. (It really has to be soft for this so melt it slightly if you have to it should have the consistency of mayo)

1/4 cup Sugar

1 cup AP Flour

1/4 tsp Dried lavender flowers (that are edible and you bought at a grocery store)

Pinch of salt

Rhubarb Curd

400g Rhubarb (about 7 thickish stalks)

1 cup sugar

6 egg yolks

Zest of 1 lemon

2 tbsp Unsalted butter

Preheat the oven to 350

Lightly grease a 10inch-4 inch tart pan. If you don’t have one of those you can use a 6 inch round tart pan.

In a food processor combine the sugar, flour, lavender and salt. Pulse until you can barely see the lavender flowers. Alternately, you could crush the lavender in a morter and pestal and then add that to the dry ingredients.

Add in the butter. In a food processor you can just pulse it until it becomes a crumbly dough, or you can do this in a standing mixer or by hand. It’s not a big batch.

Press this into your tart pan

bake it for about 20 minutes, or until it has become a slight golden browncolor.

Meanwhile make the curd- Mix half the sugar, the rhubarb and 1/4 cup of water in a pot and simmer on medium heat until the rhubarb falls apart, about 10 minutes.

Transfer the liquid into your food processor. Blitz it until it’s quite smooth, then add the sugar. Once that’s combined add in the egg yolks and mix them right away. Next add in the butter.

It should be a smooth pale color. If you don’t have a food processor don’t worry, this will be beautiful if it’s not pureed, it will just be a little fibrous. You can whisk in the rest of the ingredients by hand easily too, not a worry.

Pour the curd into the tart shell and smooth with a spatula. Bake for about 10 minutes until the top has set. And c’est finis. 

Floating Vases DIY

Big changes are about to start happening around here. Not quite yet, but pretty soon. 

In preparation for this I’ve baked some cakes and had some pictures taken and I’ve been working with some very talented people. I’t pretty exciting.

One of the things that will change soon are the wedding cake pictures, and so recently I filled my house with baked goods and crafted my little heart out, and had a friend come by and take some pictures. And while I’m not quite ready to but those up yet, here is a sneak peak and a little DIY!

I really wanted to have lots of flowers for the shoot, but I also really wanted to keep it looking clean and crisp and a little minimal. I’ve been seeing some floating vases lately and loved that idea but I didn’t have the right sized vases… and then…

Sometimes you just need to look around! I found these at my local Italian grocery store, and they cost 79 cents each. So I bought 8 of them, poured out the juice (FYI the peach pulp+bubbly=bellini!), soaked them well and then washed them off, which was pretty easy actually. 

Then I tied a string around the lip of each of them.

Then I nailed a few holes in my wall. With very very thin nails. Sorry landlord.

After that just tie them to the nails and the length you wish- I like them when they’re mis matched but that’s just me. Now fill them with water and flowers!

Cultured Butter At Home

If a true baguette is a French nobleman, tall and lean, a crusader for tradition and preservation, then butter is the stout and shy wife, staying home and cooking while her husband goes out and gets all the attention. But, if I’m going to keep these metaphor going, she is an unsung hero, because good proper French butter, cultured and flecked with sea salt is beautiful and delicate, and tastes better the next morning that her stale mate.

My love for butter is long stated and probably can be traced back to one of my favourite childrens book to a poem where the King is so distraught that he can’t get butter with his bread that he goes back to bed saying “No one could call me a fussy man, BUT, I do like a little bit of butter for my bread”. A trip to France a couple years ago cemented it for me, butter is a beautiful beautiful thing.

Normandy is famous for it’s butter, and rightly so, but Normandy is a long way away from my Vancouver apartment. So I’ve been looking up ways of making butter recently. I remember doing it as a kid, taking a jar and shaking it until the fat split from the liquid, and I’ve done it in restaurants when there is cream about to go off, but it always makes simple plain butter. The butter I’ve been dreaming about since Paris has a much greater flavour to it.

So when I saw this recipe on Food52 I new it was fate.

Friends, this is damn good butter, as best as I have tried on this continent. The trick is to be patient, to use the absolute best cream you can find and to have some really good bread to spread it on when it’s done.

Proper French-Style Butter

1L Whipping Cream

2 tbsp Plain Yoghurt

2 tsp Fleur de Sel

In a large bowl mix together the cream and the yoghurt. Let it sit, covered, at room temperature for at least 2 hours or longer if you wish. Check it periodically by dipping a clean finger (or spoon!) into it and tasting it. Once it gets a nice slightly cultured, sour taste to it you can start whipping it. You can do this with a standing mixer, a handheld mixer or you can put it in a well sealed jar and shake it.

In my standing mixer this stage took about 15 minutes, but the cream with thicken and then start to seperate, the fats splitting from the liquid.

While this is happening put a colander inside a bowl, and line the colander with cheese clothe or a thin tea towel.

Let it strain for half and hour or so, you can give it a squeeze periodically to help it a long.


Once nearly all of the moisture is gone and if you pinch it between your fingers it doesn’t bead out bits of water your ready to go. On a clean counter top press it down into a small square. Sprinkle the salt on top and then fold it in half, then again then again and again.

Then you can press it into a mold, or just put it in a bowl like I did, with a little more salt sprinkled on top!  

Thai Chicken Noodle Salad

If theres one thing I find myself making over and over it’s noodle salads. They take wonderfully to nearly anything in your fridge, making them very simple and super cheap, a winning combination for this unemployed girl. I think it’s because I make them so often, and I throw in nearly anything that I worry that they’re not good enough for the blog space and I pass over them again and again when I’m making them. 

That changes with this chicken. It’s a simple enough start, mix a few ingredients and marinate some chicken for an hour or two before frying it up, but it makes this throw together lunch into a legitimate dinner, and a damn good one at that. 

The marinade comes from Martha Stewart, but the rest of the ingredients I think are up to you. I’m putting a guideline for what I use, but it varies greatly depending on the season and if I’m willing to get up and go to the store, or if I have enough in the vegetable drawer of my fridge to make do. Fresh herbs are crucial though, don’t skimp out on those. The cilantro and mint are vital and if you can find thai basil, it really elevates this, although depending on your local shops it can be hard to find. 

Marinade

2 Cloves of Garlic, minced

1/2 cup Soy Sauce

1/2 cup Rice Wine Vinegar

2 tbsp Brown Sugar

2 tbsp Lime Juice

1/2 tsp anchovie fillets, minced

1/2 tsp Sambal Olek, or another garlic chili sauce

1 1/2 lbs boneless skinless chicken thighs, cut into thin strips

3 1/2 oz Rice Noods

2tbsp Sesame oil

Half a Cucumber. Cut in half and then sliced thinly

2 carrots, Julienned

1/2 cup Bean Sprouts

1/2 bunch green onions, sliced thinly

1/2 cup toasted peanuts

a handful of cilantro

a handful of mint

To make marinade, mix all ingredients together in a bowl

Put half of the marinade into a plastic zip-loc bag and add the chicken. Mix together and let marinade at least an hour or up to overnight.

Meanwhile, bring a large pot of water up to a boil. Cook your noodles to the package instructions. Strain and run under cold water, stirring occasionally until the noodles are totally cold to the touch. Toss with 1 tbsp of sesame oil. 

In a frying pan over medium heat, heat up the remaining sesame oil. Add in the chicken and cook, stirring regularly until it’s all cooked and the pan is almost dry.


Put the noodles in a large bowl, Mix the remaining marinade with the veggies and put that on top, top that with the chicken and then sprinkle the peanuts on top. And your in business. 

Salted Dark Chocolate Flourless Cookies

I’m not going to lie, I made these cookies entirely out of curiousity. King Arthur Flour, which gives recipes that usually involve, you know, flour, had a picture of the best dark chocolate cookies and said that they were flourless. 

The strange thing though, is that there is no starch in them. And no fat. They are not “healthy” cookies with quinoa flour and coconut oil. These ingredients are just flat out missing from the equation.  They are, by far the weirdest cookies I’ve ever made. Egg whites, cocoa powder, icing sugar and vanilla. That’s about all folks. 

Fudgey isn’t quite the right word for them even though that’s how King Arthur descubes them, they get very crispy on the edges, almost they way you would excpect them to if there was corn starch in them, but the centers stay very soft. And, they don’t get stale. At least, I made them 3 days ago and the are still sitting on my counter on a plate without having been wrapped and they are still soft in the middle. 

This is no small miracle friends. 

So without further ado, here is a painfully simple recipe, for very strange, but very delicious cookies

  • 2 1/4 cups confectioners’ sugar
  • 1/4 teaspoon salt
  • 1 cup cocoa powder, Dutch-process 
  • 3 large egg whites
  • 2 teaspoons vanilla extract
  • Fleur de Sel- a couple tsp for sprinkling on top

Preheat the oven to 350F

Mix all the ingredients together in a bowl

Spoon 1 tbsp sized blobs on to a piece of parchment or silpat. Sprinkle some fleur de sel on top.

Bake for about 7-9 minutes, until the top is set but still a bit soft if you touch them. Let cool for a couple of minutes on the pan, and then transfer them to a cooling rack. Enjoy!

Waffle Party

It is no secret that I love planning parties. I love baking with a color theme, I love being able to actually use all the little pitchers and cake stands that I collect, and I love all the little crafty details. So I can’t tell you how pleased I was when my dear friend Beth called me up and said “I’ve decided I want to get all the girls together for mimosas and waffles for my birthday, and I’ve decided this should be at your house”.

I really do love making brunch (I ran a brunch restaurant for a couple years) and I also really love my friend Beth. It was great fun, and a total perk was that a few of the guests were photographers.

I’ll put up some of the recipes soon, I promise, but in the short term, here’s a glimpse at the day. Most of the photos are from my fabulously talented friend Shannyn , a couple are mine!

The spread:

For sauces I made coconut milk chocolate ganache, salted caramel sauce and maple syrup, and I served pots of preserves I made last summer, like vanilla soaked mandarins, earl grey canned peaches, and blackberry compote.

(c.o Shannyn Higgins Photography)

(c/o Shannyn Higgins Photography)

Coffee and a cookie:

(c.o Shannyn Higgins Photography)

The birthday girl:

(c.o Shannyn Higgins Photography)

More bubbly?

(c.o Shannyn Higgins Photography)

(c.o Shannyn Higgins Photography)

(c.o Shannyn Higgins Photography)

Cauliflower and Cumin Fritters with Lime Yoghurt

I find myself over and over again seasoning everything with fennel seeds, dried chilis and lemon zest. A little rosemary if I’m feeling crazy. It’s a fantastic combination, for pasta sauces, a big plate of sauted veggies, roasted meats, it works on nearly everything. But I’ve been finding lately that I’ve been a little bit on auto-pilot with them. It’s easy, it’s comforting but I’m finding it a little tired lately.

And whenever I’m in a food rut, I turn to Ottolenghi.
His food is simple, easy, and elegant, but it’s also heavily influenced from his Isreali background, and his use of spices is immaculate.

It’s never heavy or laden with them but there is always a waft or coriander, or a hint of rosewater in his food that makes you curious about your food. I like to be curious about my food.

These fritters are no exception. The cauliflower and cumin are a brilliant marriage and the lime yoghurt cuts through any heaviness, making it a perfect appy on it’s own or a great light supper with a salad. Although, with a poached egg on top, this could also be an epic breakfast.

Cauliflower and Cumin Fritters with Lime Yoghurt

(almost exactly how it appears in “Ottolenghi”

Fritters

1 small Cauliflower, cut into florets

1 cup AP Flour

3 tbsp Chopped Flat leaf Parsley

1 clove, Garlic- minced

2 Shallots- minced

4 Eggs

2 tsp Cumin, ground

1 tsp Cinnamon

1/2 tsp Tumeric

1 1/2 tsp Salt

1 tsp Black Pepper

Oil to fry

Lime Yoghurt

300g Greek Yoghurt

2 tbsp Finely chopped Cilantro

Zest of 1 Lime

2 tbsp Lime juice

2 tbsp Olive Oil

Salt and Pepper

Mix all the yoghurt ingredients together in a bowl, set aside.

Bring a large pot of water to a boil. Add in a healthy pinch of salt and cook the cauliflower until it’s soft, about 15 minutes. Drain.

While the cauliflower is cooking mix together all the other ingredients (except oil) and beat until smooth. Add in the cauliflower and mix that in too.

In a frying pan on medium heat add in a good glug of oil and heat until it’s hot- put a tiny dollop of the batter in, when it starts bubbling your ready to go.

Carefully spoon in the batter and let fry until a bubble or two appears on the top and the edges and the bottoms get a nice brown color. With a spatula flip them over and repeat on the other side. Continue cooking until they are all done, then serve them with a generous helping of the lime yoghurt.

Hot Cross Buns

My mom does not like to bake. I don’t remember her ever making bread or pizza dough, there was a good bakery near us growing up and that was good enough for us. The only time she ever got the yeast out and used it, was for hot cross buns.

She would make it right before bed and put it in the fridge over night. In the morning she would wake up before all of us and pull it out, and let it proof and we would wake up to the incredible smell of freshly baked bread. It was such a treat.

My mom loyally made Marion Cunningham’s for years, and they are darn good. But I had some at a friends house a few years ago that had more of a spice to them, and when I saw this Jamie Oliver recpie I just had to try it.

These are beautiful hot cross buns, with more then a vague hint of spice they are very soft and gently sweet. I made a few changes, I use honey instead of sugar, and I added salt, because everything tastes better with a bit of salt, and they are splendid. And officially my new go to hot cross bun recipe!

Hot Cross Buns

(adapted from Jamie Oliver)

1/4 cup Honey

2 1/4 tsp Yeast

2/3 cup Water- warm but not hot, about the temperature of your body.

3 cups Flour

1 tsp Cinnamon

1/2 tso Ginger

1/2 tsp Nutmeg

1/2 tsp Cardamon

1/2 tsp Salt

1 cup Currants

Zest of 1 Orange

1/4 cup Butter- melted

1/4 cup milk- warmed slightly

1 Egg

Egg wash

1 Egg Yolk

2 tbsp Milk or Cream

Icing

1 cup Icing Sugar

1-2 tbsp Cream or Milk

Make Hot Cross Buns

Mix 1 tablespoon of the sugar with the yeast and water, and let it sit until it gets frothy on the top.

Meanwhile, in the bowl of a standing mixer fitted with dough hook mix all the other ingredients.

Make a well in the middle and Pour the yeast mixture into it.

On slow to medium speed mix the dough until it becomes soft and elastic, and if you stretch a little piece of it with your fingers you can get it so thin you can almost see through it.

Put it in a bowl and let it sit in a nice warm place for about an hour or until it has doubled in size.

Once it’s nice and big take it out of the bowl, put it on a work space- if it’s sticky you can add a bit of water but you shouldn’t need to.

Cut it in half and then roll out each half into a log and cut into 6 equal pieces.

Roll them into balls- put the palm of your hand over each piece, apply a decent amount of pressure and slowly move your hand in circles. After about 4 circles flip the piece upside down- it should be sealed on the bottom. If it isn’t, push it into a few more circles. This takes some practice, but don’t worry if they’re not perfect.

Put them into a buttered baking dish- I used an 8x8 inch square pan.

(Note: If you want to bake these the next day, cover with saran wrap and put them in the fridge. The next day take them out and let them come to room temperature and double in size- this will take about 2 hours.)

Cover with seran wrap and let sit until they’ve doubled in size again.

Preheat your oven to 350F

Mix your egg wash and gently brush it on top of the buns.

Put into the oven and cook until the buns are gently crisped on the top, have turned a nice brown colour, and are cooked inside- about 25 minutes

Once they have cooled mix your icing- Combine 1 tbsp of milk or cream with the icing sugar and mix until they’re totally combined and lump free. If it’s too thick add a little more cream, if it’s too thin add a little more icing sugar. You want it to be reasonably thick so it will stay in nice lines.

Put the icing in a piping bag and pipe on the crosses.

C’est Finis!

Salty Sweet Chocolate Biscotti

If there is a baked good you should always have on hand it’s biscotti. Mostly because it’s easiest to make it in large batches and keeps for nearly ever, but also because it’s delicious and you can eat them with lunch, lunch, dinner, or a late night espresso. (Or if you, like me, can’t drink coffee, a hot chocolate is a wonderful substitute.) 

This is a wonderful recipe for lots of reasons, but mostly because it’s not too sweet. The addition of coffee into it helps bring out the very dark slightly bitter taste of the chocolate, and the sprinkling of salt, alongside the sugar on the top makes you not feel guilty when eating one for breakfast with a hot chocolate!

Salty Sweet Chocolate Biscotti

1 cup Brown Sugar

12 cup Butter, melted

1/4 cup Brandy,

1 tbsp Vanilla Extract

1 tbsp Coffee

1 cup Whole Almonds

3 Eggs

1 3/4 cup AP Flour

1 1/2 tsp Baking Powder

1 cup Cocoa Powder

1/2 cup Dark Chocolate Chips

1/2 cup Coarse Sugar-For sprinkling

2 tbsp Coarse Salt- For sprinkling

Preheat oven to 350F

In a large bowl mix together the butter and sugar.

Add in the eggs one at a time mixing well between each addition.

Add in the brandy, vanilla and coffee.

In another bowl sift together the flour, baking powder, and cocoa powder.

Gently mix the flour mixture into the butter-sugar-eggs mixture. When it’s nearly all combined add in the chocolate chips and the almonds and mix until it’s just come together.

Divide the dough into 3 pieces and roll each one out into a log, and then flatten it gently on the top. If it’s sticking to your fingers get them a little bit damp and then try again. Do this on a lined baking sheet.

Gently brush the tops of the rolls with water and then sprinkle the salt and sugar on top.

Bake for about 20 minutes or until the rolls are completely cooked throughout. Let cool.

On a cutting board with a serated knife cut the logs into thin pieces, about 1/2 inch thick. Put them back on the baking pan, lying flat, and bake again until they are crisped nicely, about 10 minutes.

Let cool and enjoy- these will last at least 6 weeks in a closed container.

Poached Eggs with Moroccan Spiced Root Veggies.

I know, it’s been a long time. I could say I’ve been busy, and that would be true, but I am suddenly, unexpectedly un-busy now. And while that is terrifying, and it is, it also means that I can spend a little (or a lot) more time focussing on this. This little space in the internet where I write and post and give recipes and get a huge amount of satisfaction. So even though I’m pretty scared about my current employment situation, (I was working for a very small company that was very slow, and I lost my job because of that last week) I’m also excited about writing every day again, and baking every day.

When I came home unemployed on the weekend, it was still morning and I didn’t really want to talk about it yet, so I made breakfast. Not a fussy breakfast, but one that takes a bit of time and a bit of love and a bit of focus. Which is what I have an abundance of right now.

Poached Eggs with Moroccan Spiced Root Veggies and Garlicky Yoghurt.

*I have a great Moroccan spice mix that I bought at a farmers market, but you can make your own easily. This is a good one here.

1 1/2 cups nugget potatoes cut in half

1 small bunch of Carrots

1 tbsp Olive Oil

1 tbsp Moroccan Spice Mix

2 Eggs

Handful of Cilantro, roughly chopped

Salt and Pepper

1/2 cup Yoghurt

1/2 tsp Salt

1 small clove garlic

Put the potatoes in a small pot covered in cold water. Bring to a boil. Strain.

Cut the carrots into 1inch pieces.

In a large saucepan over medium heat warm the olive oil. Add in the potatoes and carrots and fry until they turn a nice auburn colour.

Meanwhile bring a medium sized pot of water to a boil.

While all this is happening peel and mince the garlic. Use a garlic press or the flat side of your knife to squish it into the smallest pieces possible.

Add the garlic and salt to the yoghurt.

Once the potatoes and carrots are a nice brown turn off the heat and add in the spice mix and cilantro.

Now you can poach the eggs. Drop them in one by one to the water. You want a solid simmer, but not a boil. Let them simmer until the whites feel firm but the yolk is still soft when you push on it.

But a shmear of yoghurt on the plate, pile on some veggies and put the egg on top. And there you have a simple, beautiful breakfast.

Saturday Morning Reading

A few things to read and look at before your weekend really begins.

I love finding out the history behind recipes, and if leads me to Hemmingways contemporaries in 1920’s Paris. You know I’m sold. This is a completely charming history of the Boulevadier- 1 part Manhattan, 1 part negroni, 2 parts totally sold. Click here for the story in the NYTimes.

As we redo our apartment all I find myself wanting is simple, natural, clean lined objects. (This may come as a shock to anyone who knows me but I really want to clutter out!) These elegant pieces from David Stark are just up my alley. 

I love this black magnetic knife rack. It’s a little different, a little industrial and it’s made out of compressed paper. Tres cool.

Magnetic Knife Strip - Large

On a serious note, we have to talk about this people. There just isn’t enough food. There are solutions to this. The involve communities learning to feed themselves, not companies like Monsanto sending grains thousands of miles across the planet. 

On a happier note, I bought this print  (well okay it’s a tea towel but it’s so beautiful I’m calling it art) while I was in Toronto at Christmas and it’s finally up on my wall! In love.

Brown Butter Apple Cake

Most people who have ever talked to me for more then 5 minutes has probably heard be complain about my landlord. He is a glorified slumlord, who fixes nothing and does nothing and is exceedingly cranky more often then not. He doesn’t do a good job when problems arise and so they keep happening over and over again and he blames you for his shotty work. 

I am not a fan.

However, since Jordan has moved in, my gay landlord has been much more open about fixing a few things up. Apparently my charm is useless on him, but my handsome man is getting things done. 

It has been a crazy couple of weeks, but my apartment is now the proud owner of new dark laminate flouring, a glorious step up from the heinous 70’s grey industrial carpeting I’ve been living with for years. But heres the thing about putting in new flouring, you basically move. Everything you own has to be put into boxes and moved somewhere else and it is a hassel my friends. 

Now we’re starting to paint and put things together and, thankfully, my kitchen is back and working, and Jordan is so good looking we even got a new fridge! Miracles do happen friends.

So a couple days ago when everything was covered in dust and it reeked of paint fumes and all my books we’re in boxes and I was starting to go crazy, I did what I always do when I’m stressed, and I baked a cake. 

A wonderful cake too, rich from brown butter and brown sugar sauteed apples on the top. Most cakes get their moist crumb from lots of butter and sugar but this cake gets it form the buttermilk so it’s not to sweet ot two heavy. It also uses whole wheat pastry flour, which is very uncommon for me, but it adds a pleasant nuttiness without feeling too healthy. The top has some coarse sugar and salt so it gets a bit of a crunch when you bite in. 

The best part though; it doesn’t need a mixer, you put it together like a muffin base, just mix wet with dry, so it doesn’t dirty up the kitchen too much.

And then, with cake in hand I cleaned, and dusted, and gathered bags and bags to give to charity and felt like things would be okay. 

Brown Butter Apple Cake

Adapted from 101cookbooks. 

2 1/2 cups whole wheat pastry flour
1 tablespoon baking powder
3/4 cup brown sugar
1/2 teaspoon salt
2 eggs
1 cup buttermilk
1/4 cup butter, melted and cooled a bit
zest of 1 lemon

1 tbsp Vanilla Extract
1 large apple, or 2 small guys, peeled and sliced.
3 tablespoons large grain raw sugar
1 teaspoon large grain salt

Preheat oven to 325F

Butter and flour an 8 inch cake pan.

In a small sauce pan on medium heat melt the butter. Keep it on the heat after it melts until it bubbles and gets frothy and starts to get a sweet nutty smell, and you can see little brown bits at the bottom. Set aside.

In the same pan add the apples and 1/4 cup of the brown sugar and sautee until the apples are translucent and soft- about 10 minutes. 

In a large bowl mix together the flour, sugar, baking powder and salt making sure there are no lumps of brown sugar.

Mix together the butter, buttermilk, eggs, zest and vanilla and then add it to the dry ingredients being careful not to over mix. 

Pour the batter into the pan and use a spatula to level it. Carefully place the apple slices in a nice pattern on top. Sprinkle the coarse sugar and salt on top.

Bake for about 30 minutes or until an inserted skewer comes out with only a few moist crumbs. 


Sunday Staples- Poached Salmon and Soba Noodles in Miso Broth


This is one of those amazing meals that takes under half an hour to make but is absolutely nice enough to serve company. It is also deeply satisfying without being heavy at all, it’s downright healthy actually.

Soba noodles are my favourite thing right now. Don’t get me wrong I’ve been eating and cooking with them for years but for some reason they’re all I want lately. In salads, in stir fries, and now in a soup of sorts. This is also a recipe that is very forgiving and can take nearly any substitution. Not the right time of year for salmon? A white fish would be delicious. Can’t get fresh fish? Chicken it is!- although that will need longer to cook. The vegetables are also loose, bok choy, broccolini, gai laing would all great alternatives. 

Poached Salmon with Soba Noodles in Miso Broth

Broth

5 cups Water

1 bunch Green Onions

Handful of Cilantro

1 stick Lemongrass

1 1inch knob of Ginger

2 tbsp Soy Sauce

1tsp Sambal Olek

1 tbsp Sesame Oil

1 tbsp Miso Paste.

Fillings

2 Fillets of Salmon

1 Head Broccoli (Bok choy would also be great!)

2 sticks Celery

2 Bundles of Soba Noodles

6 Shiitake Mushrooms

Using the back of your knife bruise and cut your lemongrass until it will fit in your pot and is very aromatic.

Cut your green onions- use the white parts for some pretty little slices and then roughly chop the tops.

Add the tops of the green onions, the lemongrass, and all the other ingredients for your broth into a medium pot. Bring to a simmer. Let it simmer for about 10 minutes, then strain it into another pot. Bring it up to a simmer again.

Meanwhile bring a large pot of water up to a boil and season with salt.

While thats all happening cut your broccoli into little florets and slice your mushrooms and celery.

Once your water is boiling add your soba noodles, broccoli, celery and mushrooms and boil for about 6 minutes.

Add your salmon to your broth and turn the heat very low.

Once your noodles are cooked strain them and then place some of the soba and the vegetables into your bowls.

Add the salmon and ladel some of the broth on top. Add your slices of green onions and your done!

No Knead Bread

know, I know, I’m slow to the trend here. In my defense, when the Sullivan Street Bakery Cookbook came out a few y ears ago, I did make the famous no-knead bread a few times, and I thought it was great, honest, but somehow it got pushed to the back of my mind and I forgot about it. I tried a few other kinds of bread, the kinds that are laborious and time consuming and rarely work with my crappy oven anyways and then out of the blue I remembered.

I am going to make this bread ALL THE TIME.

Seriously it’s delicious. It’s also so simple, so easy, so entirely something I can throw in a bowl before I go to work and finish when I get home so I can have freshly baked bread with my supper. And there are very few breads I have time to make on a work day, so that’s no small miracle in my books.


No Knead Bread

(Adapted from the Sulivan Street Bakery)

3 cups AP Flour

1 1/2 cups Water

1/4 tsp Yeast

1 1/4 tsp Salt

2 tbsp Rye Flour, optional

Mix all the dry ingredients in a bowl

Add the water and mix for about a minute or until it’s lump free and starting to feel very soft.

Put the dough into another bowl that has been brushed with olive oil. Cover it with cling wrap and let it sit for 12 hours. I’d be lying if I said I did this. It was 10 max and my bread was still wonderful.

Once all this time has elapsed put the dough on a well floured surface, fold it  few times and let it sit for 15 minutes. Now form it into a ball (don’t be too fussy with it) and let it double in size. This took over 2 hours for me but my apartment it a little chilly.

Preheat your oven to 450F and put a 4 quart pot into the oven to get hot.

Once the oven is totally preheated and the pot is scalding take your dough, flip it upside down into the pot, put a lid on it and slide it into the oven for 30 minutes. After your timer goes off take the lid off and cook it for another 15-30 minutes until it gets a deep aubourn brown. Mine got a little further then brown and it was still delicious.

Take it out of the pot (careful now, don’t burn yourself!) and let it sit for at leaste 20 minutes before you carve into it. The bread will be better and you will be able to digest it better once it sits. Cest Finis!

Sunday Staples- Broccoli, Kale and White Bean Salad

First things first. I’m sorry. I really am, I have never been a worse blogger, and I haven’t even been doing this for a year yet. I’m terrible. I could give you a list of excuses, but I won’t. Just please believe that I will get better. I promise I will.

Secondly, I am promising myself, to take more time to cook at home, eat less Tim Horton bagels and plan meals a little in advance so I don’t get home after a long day at work, and end up with take out. I’ve been doing that a lot, and it’s no good for anyone.

So, to fix both of these problems, every Sunday I’m going to post a recipe that is a simple, easy to make dinner that uses ingredients I keep on hand most of the time. Something not fussy, and by telling you right now, that I will do this every Sunday, it will force me to both blog, and eat better. Done deal.

The first one here is painfully easy, but also something I make all the time, mostly because you can substitute anything into it. I made it here with broccoli and kale, but it would be delicious with brussel sprouts, cauliflower, asparagus, anything really. Similarly the white beans are my favourite but chickpeas, romano beans, or fava beans would be equally lovely.What makes it so good as that you take vegetables that normally you steam and you saute them, which locks in the flavour and adds in the crispy exterior and a sweet caramelized taste.

It’s a beautiful thing really, and it takes about ten minutes to get it on the table. This is the sort of salad I make for lunch or for dinner for myself, although if Jordan’s eating with my I usually have to grill a sausage or a chicken breast for him and his manly appetite. But for this girl, the salad is enough.

Broccoli Kale and White Bean Salad

1 large head of Broccoli

1 bunch of Kale

1 tin of White Beans (or 1 cup soaked over night), rinsed well and drained carefully.

1 Onion, thinly sliced

1 clove of garlic, minced.

1 tsp Cider Vinegar, Red Wine vinegar or lemon juice.

A good pinch of dried chili peppers- depending on your space.

A couple good glugs of olive oil

Salt and Pepper to taste.

In a large saucepan on medium heat add some of the olive oil and cook the onion until it’s very soft, about 8 minutes.

Add in the beans and cook until they get brown and crispy. You may need to add more olive oil to prevent browning.

Add in the broccoli and cook for another 5 minutes, until it starts to brown on the edges and turns a deep green. Add the kale and do the same.

Add the vinegar and season to taste. A Voila, c’est finis!

Momofuko Crack Pie

I think I might have completely fallen in love with this if not for the name,

Crack pie. Named of course, after the highly addictive drug whos prevelance in Vancouver has led to the notorious Downtown East Side. No joking around here. It’s a big name to live up to. You’d almost feel sorry for it really, so much hype in the title, it couldn’t possibly stand up.

It is, indisputably, a very good pie. It really is, it’s sort of a glorified butter tart perhaps, (for the non-Canadians out there, it’s like a pecan pie without the pecans). It’s nuttier then the usual because of the cleverly made crust, which is filled with toasted oats, and I made mine nuttier still by adding hazelnuts, and also some chocolate which meant you really only needed a small slice. Perhaps that was it, I just didn’t really want more then one slice. The addictive neede-to-have-you just wasn’t there, but it’s hard to say. I think there is a pretty good chance that had it been called, oh, butter tart with toasted oat crust, I would have fallen helplessly for it. I think, in fact, that it’s likely. 

Crack Pie

(from the Momofuko Milk Bar Cookbook, by Christina Tosi and David Chang)

Crust
2/3 cup plus 1 tablespoon flour
Scant 1/8 teaspoon baking powder
Scant 1/8 teaspoon baking soda
1/4 teaspoon salt
1/2 cup softened butter
1/3 cup light brown sugar
3 tablespoons sugar
1 egg
Scant 1 cup rolled oats

Preheat the oven to 350F

Cream the butter and sugar together.

Add the egg and mix well.

Add in all the remaining ingredients except the oats. Stir until just combined and add oats.

Spread out with your hands (if you get them a little wet they won’t stick as much!) and bake until it becomes a golden brown and the cookie is cooked through. As you’ll be crumbling and rebaking it, ere on the side of over crisp then gooey.

Ingredients
Crumbled cookie for crust
1/4 cup butter
1 1/2 tablespoons brown sugar
1/8 teaspoon salt

Directions
Combine the crumbled cookie, butter, brown sugar and salt in a food processor and pulse until evenly combined and blended (a little of the mixture clumped between your fingers should hold together). Divide the crust between 2 (10-inch) pie tins. Press the crust into each shell to form a thin, even layer along the bottom and sides of the tins. Set the prepared crusts aside while you prepare the filling.

Ingredients
1 1/2 cups sugar
3/4 cup plus a scant 3 tablespoons light brown sugar
1/4 teaspoon salt
1/3 cup plus 1 teaspoon milk powder
1 cup butter, melted
3/4 cup plus a scant 2 tablespoons heavy cream
1 teaspoon vanilla extract
8 egg yolks
2 prepared crusts

Directions
Heat the oven to 350 degrees.

Whisk together the sugar, brown sugar, salt and milk powder. Whisk in the melted butter, then whisk in the heavy cream and vanilla.

 Gently whisk in the egg yolks, being careful not to add too much air.

Divide the filling evenly between the 2 prepared pie shells.

Bake the pies, one at a time, for 15 minutes, then reduce the heat to 325 degrees and bake until the filling is slightly jiggly and golden brown, about 10 minutes. Remove the pies and cool on a rack.

Refrigerate the cooled pies until well chilled. Serve cold, and the filling will be gooey. Dust with powdered sugar before serving.

Pop Up Dinner!

 I’m doubting I mentioned this, but a few months ago one of my favourite people in the world lost her brother. He took his own life. It was a devestating and unexpected, and heatbreaking time, it still is for his family. I’m not just friends with his sister but also with his cousin, Kelsi, and her boyfriend Sam,who lost his step dad this year also from suicide. What I’m saying here is that suicide has been on my mind, and it’s been on theirs even more. 

They have a friend who works for a suicide prevention and education non-for-profit called Need2 an organization that relied largely on the government for it’s funding and that funding has recently been cut off completely. If it goes under there would be no suicide support or hotline anywhere on Vancouver Island. Which is terrible, and hard to handle after the year we’ve had.  So they decided to do something about it.

This is Kelsi. She is kind, organized and has a great laugh. 

The dude with the mo is Sam, he is an incredibly talented chef and maker of cured meats. 

And together they put on a fundraiser dinner at the completely charming Cabin12 restaurant. It had things on the menu like smoked salmon with watercress mousse,

Duck confit perogies, 

Bacon wrapped venison loins, 

and momofukko style crack pie with local hazelnuts and chocolate 

And macarons, of course. There were 15 volunteers all together, serving, pouring drinks, and dishing it all out in the kitchen. Some jobs (like bringing 60 macarons, the most delicate cookies on the planet, on a bus and a ferry ride from Vancouver to Victoria) were more fun than others, but it was a wonderful group of people.  

And then I spent the next day eating things like deep fried mac and cheese, because that exists. And it’s wonderful!

We also checked out Fol Epi, which is a glorious bakery, just glorious, and it makes wonderful croissants, gorgeous macarons, and the best baguette I’ve had in Canada. And I don’t say that lightly. 

I will have recipes up soon, I just thought in the meantime I would show you what I did this week, and let you all know about Need2, a great organization that needs help!

Dark Chocolate Brownies with "Candied" Chestnuts.

Does anything say cooling temperatures, red leaves, and brisk winds better then chestnuts? Those wonderful things that fall from big old trees and we roast over an open fire, but have way more purpose then we North Americans ever give them credit for.

I’m not sure I ever fully appreciated chestnuts until I went to France.

Last year I spent a month in Paris that was booked in a moment of just needing to escape and get away. If I hadn’t been  so eager to leave I might have done a little research on the weather, because 24 out of 26 days it rained. I’m not kidding. It was so grey and dismal I almost missed Vancouver, which certainly doesn’t happen often. November is not the time to visit Paris.

Unless you really love chestnuts, which fortunately, I do.

I didn’t realize until I went to Paris that you can candy chestnuts and put them in anything. You can eat them plain, you can put them in cake (gateaux aux marron glace), ice cream (creme glace avec la marron glace), anf in chocolates (marron glace avec chocolat.) Basically when the sky falls Parisiennes fall for chestnuts. So of course, I did too.

When I came back I tried to make them, and I will try again, but man oh man, this is not an easy task, and it’s one that will take some practice I think, BUT in the meantime, I can make a cheaters one and then put it in brownies and no one will know. Except you, but your alright.

Dark Chocolate Brownies with “Candied” Chestnuts

(adapted from Jamie Oliver’s Bloomin’ Brilliant Brownie recipe)

Brownies

1 heaping cup of Dark Chocolate

2/3 cup Butter

2/3 cup AP Flour

1/2 cup Cocoa Powder-use the best quality kind you can get!

4 Eggs

1 tsp Baking Powder

1 cup Packed Light Brown Sugar

Chestnuts

1/2 cup Sugar

1/2 cup Whole Chestnuts, roasted, peeled, chopped roughly.

In a small clean pot mix the sugar with just enough water to wet it, it should have the consistency of wet sand. If it’s too wet don’t worry, it will just take longer to cook out.

On high heat cook the sugar and water until it begins to caramelize. Now be careful, it will turn from light to dark very quickly. Once it starts to get auburn add in the chestnuts. It will sizzle and spit a bit, stir and stir until theirs neirly no liquid left and the sugar has crystalized all over the nuts. Put on an oven proof plate and let cool.

Meanwhile.

Preheat your oven to 350F and line an 8inch square pan with parchment on both sides. Set aside.

In a metal bowl set over a pot of simmering water on medium heat melt your butter and chocolate together.

Add in your sugar and vanilla.

Add in the eggs and stir until barely combined. Remember that eggs have a memory, if you beat them they will rise in the oven, and you want soft fudgey brownies so be gentle. Sift in your flour, cocoa, and baking powder, and then the chestnuts. Do not over mix.

Then pour that bad boy into your prepared pan and bake it for about twenty minutes, until the top has set and doesn’t wiggle but isn’t to firm. I’d err on the side of undercooked that over with brownies, personally. And then eat and eat and eat.

C

Barley Risotto

After much too long without a kitchen I can cook again. I can make tea in the morning, make soup for lunch and cook a proper dinner (I don’t, for the record, do this every day but now my kitchen is there, if I feel compelled to)

Which is especially nice right now because we’re getting that first bout of bone chilling weather here in Van, and I do not want to be leaving my house for food. I want to hibernate. I want to drink hot chocolate, and apple cider, and read books and swaddle myself in knitted blankets. That’s what I want. What I also want it barley risotto.

Risotto that warms you up form the inside out on a cold night but is healthy enough that I don’t feel to guilty about eating a cookie for breakfast the next day. Risotto that’s rich and soothing and is delicious with both grilled sausages and with sauteed salmon. Risotto that is good heated up the next day because it’s not made of rice that gets soggy. Risotto that has that nuttiness and bit of chew that characterized whole grains. Risotto that is just plain really good.

2 cups pearled barley

1/2 head of fennel, diced

1 small onion, diced

2 cloves of garlic, minced

a sprig of rosemary, finely chopped

3 sprigs of thyme, finely chopped

2 cups of chicken or vegetable stock

1/3 cup grated parm

Bring the stock up to a boil with 2 cups of water.

Add a pinch of salt and then add in the barley and cook them to their package instructions, about 25 minutes.

Meanwhile in a medium pan on medium-low heat warm up a good glug of olive oil. Add in your onions and fennel and saute until they become translucent and very fragrant.

Add in your garlic and the herbs and cook just until you can start to smell the garlic but not so that it gets any colour.

Add in the barley, the cheese and the knob of butter and stir to combine it all and check your seasoning.

And then eat this wonderful mix by itself, or serve it as a side!